Secure IoT SSH Access On AWS: The Complete Guide
Are you struggling to manage your IoT devices securely and efficiently? Mastering the art of IoT device SSH download via AWS is no longer optional, it's essential for streamlining device management, automating processes, and maintaining secure connectivity in today's interconnected world.
In an era where the Internet of Things (IoT) is rapidly expanding, the ability to securely manage and monitor these devices remotely has become paramount. Secure Shell (SSH), a protocol that provides a secure channel over an unsecured network, emerges as a critical tool for achieving this. Coupled with the power of Amazon Web Services (AWS), managing IoT devices becomes not only more secure but also more scalable and reliable. This article delves into the intricacies of setting up, managing, and optimizing IoT device SSH on AWS, focusing on ensuring seamless and secure operations.
| Category | Details |
|---|---|
| Topic | IoT Device SSH on AWS |
| Key Technologies | AWS IoT Core, SSH (Secure Shell), AWS EC2, Ubuntu |
| Benefits | Secure Remote Management, Automated Processes, Scalable Infrastructure |
| Target Audience | IoT Developers, System Administrators, Cloud Engineers |
| Reference | AWS IoT Core Official Website |
The convergence of IoT and cloud technologies, particularly AWS, offers a robust platform for managing a multitude of devices. AWS provides a comprehensive suite of services, including AWS IoT Core, which forms the backbone for device connectivity, data ingestion, and secure communication. The ability to remotely access and manage these devices via SSH adds an essential layer of control and security. Whether you're looking to troubleshoot issues, deploy updates, or simply monitor device performance, SSH over AWS provides a secure and efficient means to do so.
Setting up SSH for IoT devices on AWS involves several key steps. First, it requires configuring the IoT device itself to support SSH. This typically involves installing an SSH daemon on the device. Second, generating SSH keys is crucial for establishing a secure connection. Public-key cryptography ensures that only authorized users can access the device. Finally, establishing a secure connection through AWS involves configuring security groups and network settings to allow SSH traffic while maintaining a strong security posture.
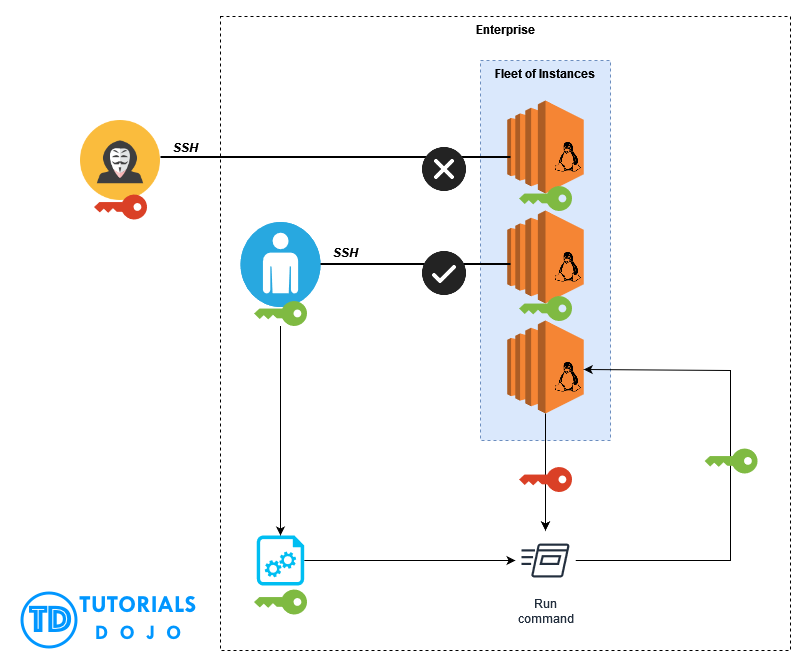
One of the common approaches involves leveraging an EC2 instance as a secure jump host. This setup involves creating an EC2 instance, generating SSH keys, and configuring security groups to control access. The EC2 instance acts as an intermediary, allowing you to securely connect to your IoT devices without exposing them directly to the internet. This adds an extra layer of security and simplifies network management.
To illustrate, consider the process of connecting an IoT device via SSH over the internet using AWS on a Windows machine. The initial step involves creating an AWS account and launching an EC2 instance, preferably running Ubuntu. Once the instance is up and running, you'll need to generate SSH keys using a tool like PuTTYgen. The public key is then added to the authorized keys file on the EC2 instance. Finally, you can use PuTTY to establish an SSH connection to the EC2 instance, and from there, tunnel to your IoT device.
- Somali Wasmo Channel Hottest Telegram Groups More
- Rory Mcilroy Faith Family Golf Star From Northern Ireland
For users who prefer a more streamlined approach, AWS IoT Device Management offers secure tunneling capabilities. This feature allows you to create secure tunnels to your IoT devices, enabling remote access for troubleshooting and maintenance. The AWS IoT console provides a user-friendly interface for creating and managing these tunnels. You can create a tunnel either from the tunnels hub or from the details page of an IoT thing that you created. When creating a tunnel, you have the option of using the quick setup or the manual setup method. The quick setup simplifies the process by automatically configuring the necessary resources, while the manual setup provides more control over the configuration.
To configure the local proxy for secure tunneling, you can either use the AWS IoT Device Client or download the local proxy reference implementation from GitHub. The local proxy acts as a secure intermediary between your local machine and the IoT device. It encrypts the traffic and ensures that only authorized users can access the device. To connect to the local proxy, you must download the source access token when creating the tunnel. This token is used to authenticate your connection to the proxy.
The AWS IoT console offers various methods for creating tunnels, including the use of the AWS Management Console and the OpenTunnel API. These tutorials provide step-by-step instructions on how to create tunnels using these methods. For example, you can create a tunnel to open an SSH session to a remote device. This allows you to remotely access the device and perform administrative tasks.
Security is a paramount concern when managing IoT devices remotely. SSH provides a secure channel for communication, but it's essential to implement additional security measures to protect your devices. This includes regularly updating the SSH daemon, using strong passwords or SSH keys, and implementing intrusion detection systems. This level of security is especially critical for industries such as healthcare and finance, where data integrity and privacy are of utmost importance.
To further enhance security, consider implementing multi-factor authentication (MFA) for SSH access. MFA adds an extra layer of protection by requiring users to provide two or more authentication factors. This makes it more difficult for attackers to gain unauthorized access to your devices. AWS provides several options for implementing MFA, including the use of virtual MFA devices and hardware MFA tokens.
When setting up SSH on AWS, it's important to configure security groups to restrict access to the SSH port (typically port 22). Security groups act as virtual firewalls, controlling the inbound and outbound traffic to your EC2 instances. By default, security groups allow no inbound traffic. You'll need to create a rule that allows SSH traffic from your IP address or a specific range of IP addresses. Avoid opening up the SSH port to the entire internet, as this can significantly increase the risk of unauthorized access.
For those using Ubuntu on AWS, the process of setting up SSH involves several steps. First, you'll need to launch an Ubuntu instance in the AWS Management Console. During the instance creation process, you'll be prompted to create or select an existing key pair. A key pair consists of a public key and a private key. The public key is stored on the EC2 instance, while the private key is stored on your local machine. When you connect to the instance via SSH, you'll need to provide the private key to authenticate your connection.
Once the Ubuntu instance is running, you can connect to it using an SSH client such as PuTTY or OpenSSH. To connect, you'll need the public IP address of the instance and the private key. The SSH client will use the private key to authenticate your connection to the instance. After you have succesfully connected, you can optimise the system as per your needs.
Another important aspect of managing IoT devices via SSH on AWS is monitoring and logging. AWS CloudWatch provides a comprehensive monitoring solution that allows you to track the performance of your devices and receive alerts when issues arise. You can configure CloudWatch to monitor various metrics, such as CPU utilization, memory usage, and network traffic. By monitoring these metrics, you can identify potential problems and take proactive steps to resolve them.
In addition to monitoring, logging is essential for auditing and troubleshooting. AWS CloudTrail logs all API calls made to your AWS account, including those related to SSH access. By analyzing these logs, you can track who accessed your devices and when. This information can be invaluable for identifying security breaches and troubleshooting issues.
To further simplify the management of your IoT devices, consider using AWS Systems Manager. Systems Manager provides a unified interface for managing your AWS resources, including EC2 instances and IoT devices. With Systems Manager, you can automate tasks such as patching, configuration management, and software deployment. This can significantly reduce the amount of manual effort required to manage your devices.
One of the key features of Systems Manager is Session Manager, which allows you to securely connect to your EC2 instances and IoT devices without opening up SSH ports. Session Manager uses the AWS Systems Manager Agent (SSM Agent) to establish a secure connection between your local machine and the device. This eliminates the need to manage SSH keys and configure security groups, simplifying the connection process.
When using AWS IoT Device Management, you can leverage secure tunneling to remotely troubleshoot devices managed by AWS IoT Core. This involves using AWS IoT Device Management's secure tunneling feature to remotely troubleshoot devices. This functionality is built on top of AWS IoT Core, providing the backbone for device connectivity, data ingestion, and secure communication. The integration ensures that all remote access activities are logged, monitored, and compliant with industry standards.
To create a tunnel using the AWS IoT console, you can navigate either from the tunnels hub or from the details page of an IoT thing you've created. When creating a tunnel from the tunnels hub, you have the option to specify whether to create it using the quick setup or the manual setup. The quick setup streamlines the process, while the manual setup allows for more granular configuration.
For configuring the local proxy, you can use either the AWS IoT Device Client or download the local proxy reference implementation from GitHub. To connect to the local proxy, downloading the source access token during tunnel creation is essential. This setup allows the use of services other than SSH, such as FTP, to connect to the remote device.
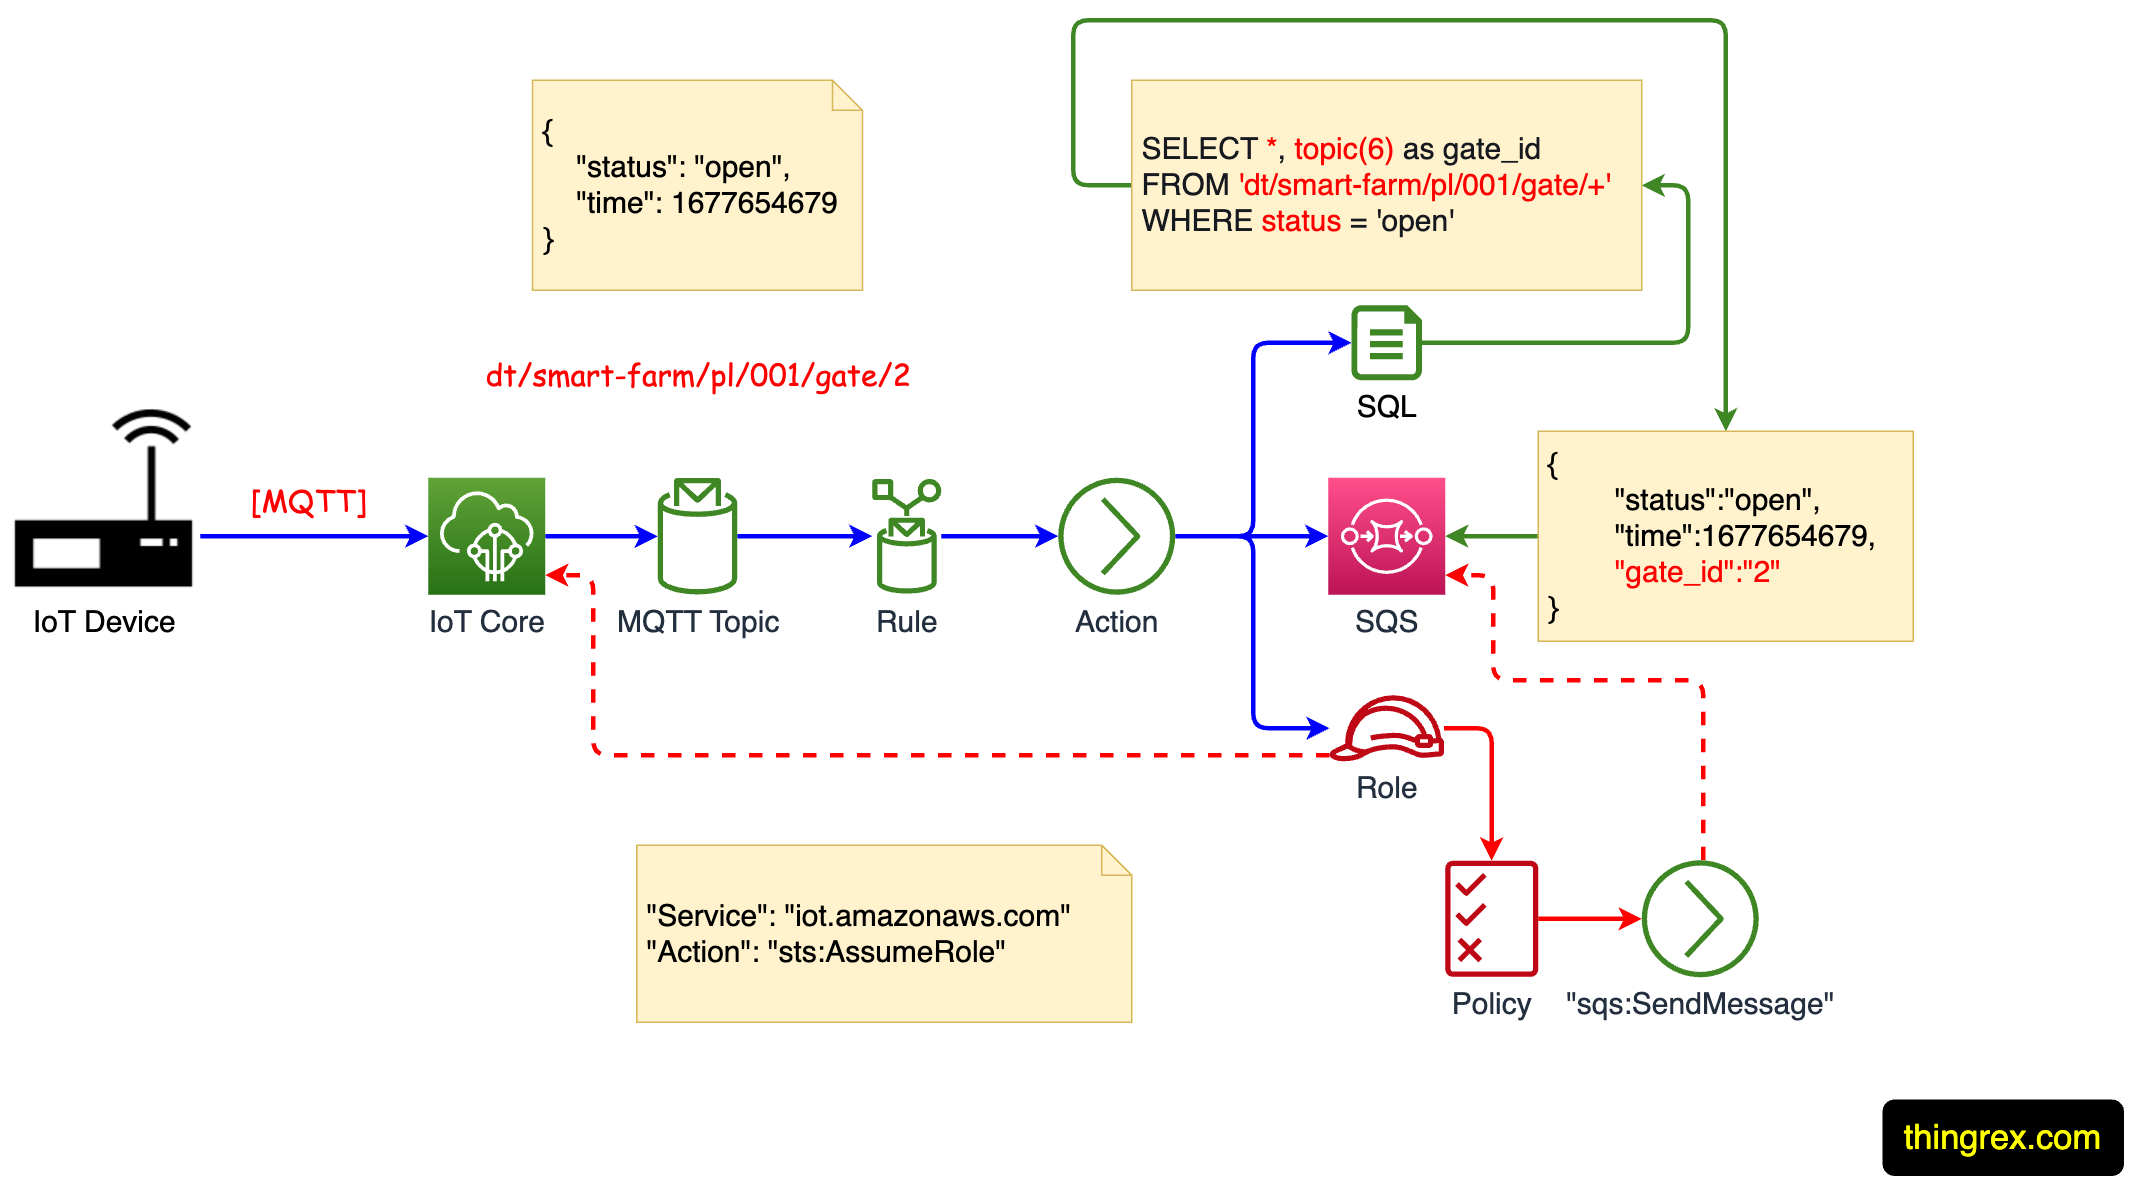
It's crucial to ensure that an SSH daemon is running on the remote device. For an example showcasing the manual setup method, refer to running on the remote device that connects to the AWS IoT Device Gateway and is configured with an MQTT topic subscription. You can find an example tutorial on opening a tunnel and starting an SSH session to a remote device to further guide you through the process.
When using secure tunneling, you might encounter situations where the source is not connected to the tunneling service in your terminal. To resolve this, select your tunnel in the AWS IoT console and verify that the source is connected. To connect the destination to the tunneling service, repeat the same steps.
To further illustrate the practicality, consider the command to install the Node.js library `ws`: `npm install ws`. This library is often used when working with WebSocket connections, which can be relevant in certain IoT applications.
In conclusion, mastering "IoT device SSH download AWS" is more than just a technical skill; it's a strategic imperative for any organization leveraging IoT. By integrating these technologies, users can harness the scalability, reliability, and security features of AWS to build robust and secure IoT applications. The ability to securely manage and monitor devices remotely ensures the safety and efficiency of your IoT infrastructure, enabling you to unlock the full potential of the Internet of Things.
- Gracie Abrams From Secret Of Us To Viral Bikini Moments
- Somali Telegram Channels Wasmo Raaxo More Join Now

How To Master IoT Device SSH Download AWS A Complete Guide
IoT SSH Download AWS The Ultimate Guide To Securely Accessing Your
Mastering IoT SSH Download AWS A Comprehensive Guide To Secure And
