SSH RemoteIoT Raspberry Pi: Free Example & Access
Want to unlock the full potential of your Raspberry Pi and control it from anywhere in the world? The combination of SSH, remote IoT platforms, and the Raspberry Pi offers a powerful and surprisingly accessible solution for remote control and monitoring.
The Raspberry Pi, a miniature marvel of computing, has revolutionized fields ranging from education to home automation. Its versatility stems from its open-source nature, low cost, and ability to interface with a multitude of sensors and actuators. But what happens when you want to access your Raspberry Pi when you're not on the same network? That's where secure shell (SSH) and remote IoT platforms come into play, providing the bridge for remote access and control. The challenge, often, lies in navigating the complexities of setting up these connections securely and efficiently.
Here's a hypothetical example: Imagine you've built a sophisticated weather monitoring station using a Raspberry Pi, complete with sensors for temperature, humidity, wind speed, and rainfall. This station is located at a remote cabin, far from your primary residence. You want to check the real-time weather conditions, download historical data, and even remotely adjust the station's settings. Without remote access, you'd be forced to physically travel to the cabin, which is inconvenient and time-consuming. With SSH and a remote IoT platform, you can accomplish all of this from the comfort of your own home, using your laptop or even your smartphone.
The key components to this remote control setup are:
- Raspberry Pi: The heart of the system, responsible for collecting data, executing commands, and interacting with connected hardware.
- SSH (Secure Shell): A cryptographic network protocol that allows you to securely access and control the Raspberry Pi's command line interface over the internet.
- Remote IoT Platform: A cloud-based service that provides a centralized platform for managing and monitoring your Raspberry Pi, visualizing data, and creating automated rules. Examples include ThingsBoard, AWS IoT Core, Azure IoT Hub, and Google Cloud IoT Platform.
- Network Connectivity: A stable internet connection for both the Raspberry Pi and the device you're using to access it remotely.
Let's dive into the process of setting up this remote control system, starting with SSH:
Enabling SSH on Your Raspberry Pi:
- Onlyfans Leaks Asiadoll Sophie Rain More The Full Story
- Debi Mazars Daughter Evelina From Runway To Italy Beyond
By default, SSH is often disabled on Raspberry Pi for security reasons. Enabling it is straightforward:
- Using Raspberry Pi Configuration: If you have a monitor, keyboard, and mouse connected to your Raspberry Pi, you can enable SSH through the Raspberry Pi Configuration tool. This can be found in the Raspberry Pi menu under Preferences. Simply navigate to the Interfaces tab and enable SSH.
- Using the Command Line: Alternatively, you can enable SSH from the command line. Open a terminal window and type:
Navigate to Interface Options, then SSH, and enable it.sudo raspi-config - Headless Setup (without a monitor): If you're setting up your Raspberry Pi without a monitor (a "headless" setup), you can enable SSH by placing an empty file named "ssh" (without any file extension) in the boot partition of the SD card. When the Raspberry Pi boots, it will detect this file and enable SSH.
Securing SSH:
Once SSH is enabled, it's crucial to secure it. Leaving SSH with its default settings can make your Raspberry Pi vulnerable to unauthorized access. Here are essential security measures:
- Change the Default Password: The default username for Raspberry Pi is usually "pi," and the default password is "raspberry." These are widely known, so immediately change them to something strong and unique. Use the `passwd` command in the terminal to change the password for the "pi" user.
- Disable Password Authentication: Password authentication is the most common target for brute-force attacks. A more secure method is to use SSH keys.
- Use SSH Keys: SSH keys use cryptographic key pairs (a public key and a private key) to authenticate users. The private key is kept securely on your computer, while the public key is placed on the Raspberry Pi. When you connect, SSH uses these keys to verify your identity without requiring a password.
- To generate an SSH key pair on your computer, use the `ssh-keygen` command:
This will create a private key (usually named `id_rsa`) and a public key (`id_rsa.pub`).ssh-keygen -t rsa -b 4096 - Copy the Public Key to the Raspberry Pi: Use the `ssh-copy-id` command to copy the public key to the Raspberry Pi:
Replace `your_raspberry_pi_ip_address` with the actual IP address of your Raspberry Pi. You'll be prompted for the password one last time.ssh-copy-id pi@your_raspberry_pi_ip_address - Disable Password Authentication in SSH Configuration: Edit the SSH configuration file on the Raspberry Pi:
Find the line `PasswordAuthentication yes` and change it to `PasswordAuthentication no`. Also, add the line `PubkeyAuthentication yes` to ensure that public key authentication is enabled. Save the file and restart the SSH service:sudo nano /etc/ssh/sshd_configsudo systemctl restart ssh - Change the Default SSH Port: The default SSH port is 22. Changing this port can help deter automated attacks. Choose a port number between 1024 and 65535 that is not commonly used. Edit the `/etc/ssh/sshd_config` file and change the `Port` directive. Restart the SSH service after making the change.
- Use a Firewall: A firewall can further restrict access to your Raspberry Pi by only allowing connections from specific IP addresses or networks. The `ufw` (Uncomplicated Firewall) is a popular and easy-to-use firewall for Linux systems. Install it with:
Allow SSH connections (on your chosen port) and enable the firewall:sudo apt updatesudo apt install ufw
Check the firewall status with `sudo ufw status`.sudo ufw allow 2222/tcp # Replace 2222 with your chosen portsudo ufw enable - Keep Your System Updated: Regularly update your Raspberry Pi's operating system and software packages to patch security vulnerabilities. Use the following commands:
sudo apt updatesudo apt upgrade
Connecting to Your Raspberry Pi via SSH:
Once SSH is properly configured and secured, you can connect to your Raspberry Pi from any computer on the same network using the `ssh` command:
ssh pi@your_raspberry_pi_ip_address -p 2222 # Replace 2222 with your chosen portReplace `your_raspberry_pi_ip_address` with the actual IP address of your Raspberry Pi. If you changed the SSH port, include the `-p` option followed by the port number.
Remote IoT Platforms: Expanding Capabilities:
While SSH provides command-line access, remote IoT platforms offer a more comprehensive solution for managing and monitoring your Raspberry Pi remotely. These platforms typically provide:
- Data Visualization: Real-time dashboards and charts for visualizing sensor data.
- Remote Control: Web-based interfaces for controlling connected devices and executing commands.
- Alerting and Notifications: Notifications via email, SMS, or other channels when certain events occur.
- Data Storage and Analysis: Storage of historical data for analysis and reporting.
- Rule Engine: Automated rules for triggering actions based on sensor data or other events.
Choosing a Remote IoT Platform:
Several remote IoT platforms are compatible with Raspberry Pi, each with its own strengths and weaknesses. Some popular options include:
- ThingsBoard: An open-source IoT platform that offers a wide range of features, including data visualization, rule engine, and device management.
- AWS IoT Core: Amazon Web Services' IoT platform, providing a scalable and secure infrastructure for connecting and managing IoT devices.
- Azure IoT Hub: Microsoft Azure's IoT platform, offering similar capabilities to AWS IoT Core.
- Google Cloud IoT Platform: Google's IoT platform, integrated with other Google Cloud services.
The choice of platform depends on your specific needs and requirements. Consider factors such as cost, scalability, features, ease of use, and integration with other services.
Example: Connecting a Raspberry Pi to ThingsBoard:
Let's illustrate the process of connecting a Raspberry Pi to ThingsBoard, a popular open-source IoT platform:
- Install ThingsBoard: You can install ThingsBoard on a cloud server or on your own hardware. Follow the instructions on the ThingsBoard website for your chosen installation method.
- Create a Device in ThingsBoard: Log in to the ThingsBoard web interface and create a new device. Assign a name and type to the device.
- Obtain the Device Credentials: ThingsBoard will generate a unique access token for the device. This token will be used by the Raspberry Pi to authenticate with ThingsBoard.
- Install the ThingsBoard Python Library on the Raspberry Pi:
pip install tb-mqtt-client - Write a Python Script to Send Data to ThingsBoard: Create a Python script that reads data from your sensors and sends it to ThingsBoard using the MQTT protocol. Here's a simplified example:
Replace `your_thingsboard_host` with the address of your ThingsBoard server and `your_device_access_token` with the access token you obtained from ThingsBoard.import paho.mqtt.client as pahofrom tb_mqtt_client import TBClient, TBPublishInfo, TBQoSimport timeimport random# ThingsBoard server detailsTHINGSBOARD_HOST ="your_thingsboard_host" # Replace with your ThingsBoard hostACCESS_TOKEN ="your_device_access_token" # Replace with your device access token# MQTT client setupclient = TBClient(THINGSBOARD_HOST, ACCESS_TOKEN)try: client.connect() while True: # Simulate sensor data temperature = random.randint(20, 30) humidity = random.randint(50, 70) # Create payload payload = {"temperature": temperature, "humidity": humidity} # Publish data to ThingsBoard client.send_telemetry(payload) print(f"Sent telemetry: {payload}") time.sleep(5) # Send data every 5 secondsexcept KeyboardInterrupt: passfinally: client.disconnect() print("Disconnected from ThingsBoard") - Run the Python Script: Execute the Python script on your Raspberry Pi. The script will connect to ThingsBoard and start sending sensor data.
- View Data in ThingsBoard: Log in to the ThingsBoard web interface and navigate to the device you created. You should see the sensor data being displayed in real-time. You can then create dashboards and widgets to visualize the data in a more meaningful way.
Practical Applications and Considerations:
The combination of SSH and remote IoT platforms opens up a wide range of possibilities for remote monitoring and control:
- Remote Monitoring of Environmental Conditions: Monitor temperature, humidity, air quality, and other environmental factors in remote locations.
- Remote Control of Home Automation Systems: Control lights, appliances, and other devices in your home from anywhere in the world.
- Remote Monitoring of Industrial Equipment: Monitor the performance of industrial equipment and detect potential problems before they lead to downtime.
- Remote Data Acquisition: Collect data from sensors and other devices in remote locations and transmit it to a central server for analysis.
- Security Considerations: When implementing remote access solutions, always prioritize security. Use strong passwords, enable SSH key authentication, and keep your systems updated.
- Network Connectivity: Ensure that your Raspberry Pi has a stable internet connection. Consider using a cellular modem or satellite internet connection in remote locations.
- Power Management: In remote locations, power can be a constraint. Consider using solar panels or other renewable energy sources to power your Raspberry Pi.
Free Resources and Examples:
The open-source community provides a wealth of free resources and examples for working with SSH, remote IoT platforms, and Raspberry Pi. Here are some useful resources:
- Raspberry Pi Documentation: The official Raspberry Pi documentation provides detailed information on setting up and using your Raspberry Pi.
- ThingsBoard Documentation: The ThingsBoard documentation provides comprehensive information on installing, configuring, and using the ThingsBoard platform.
- Online Tutorials and Forums: Many online tutorials and forums offer step-by-step instructions and troubleshooting tips for specific projects.
- GitHub Repositories: Numerous GitHub repositories contain code examples and libraries for interacting with remote IoT platforms and sensors.
Troubleshooting Common Issues:
When setting up remote access to your Raspberry Pi, you may encounter some common issues. Here are some troubleshooting tips:
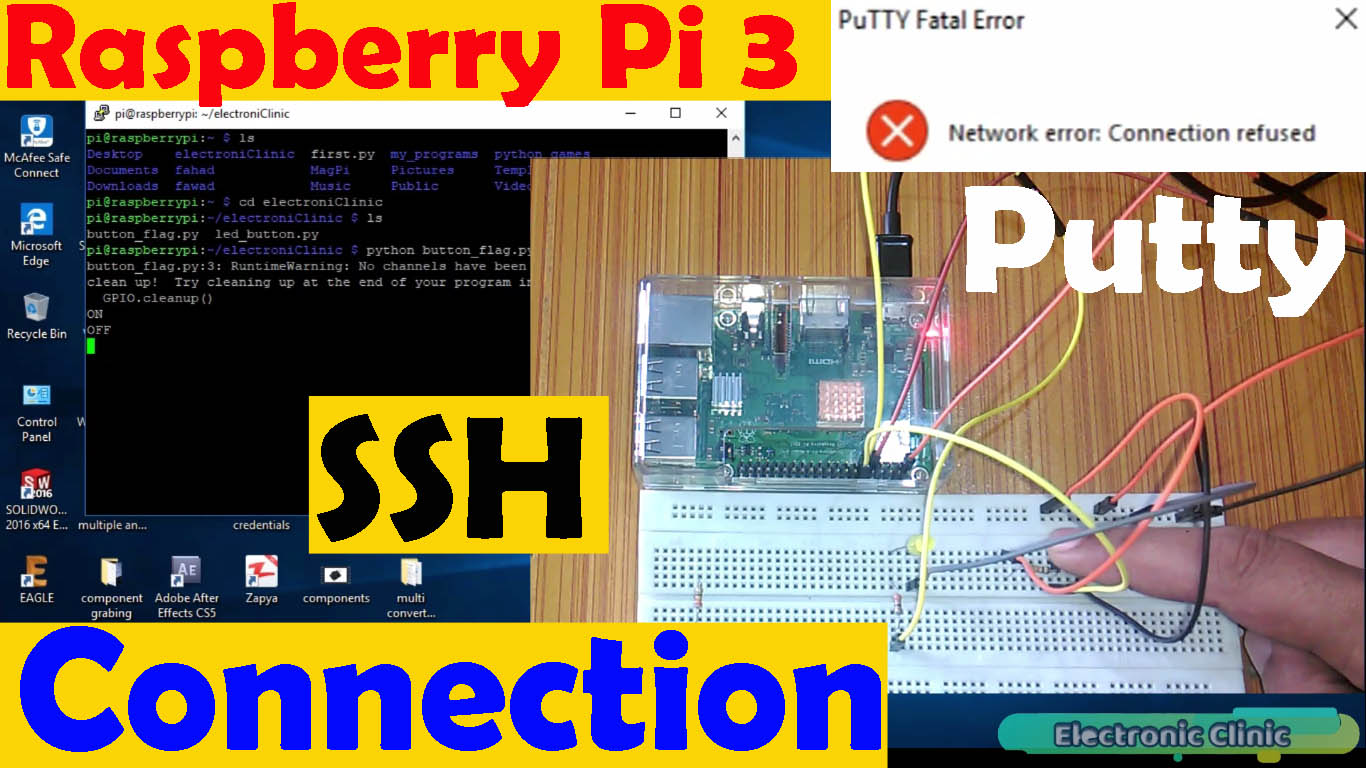
- Cannot Connect via SSH: Verify that SSH is enabled on the Raspberry Pi, that the firewall is configured correctly, and that you are using the correct IP address and port number.
- Connection Refused: This usually indicates that the SSH service is not running on the Raspberry Pi. Check the service status using `sudo systemctl status ssh` and restart it if necessary.
- Authentication Errors: Double-check your username and password, or verify that your SSH keys are configured correctly.
- Data Not Appearing in IoT Platform: Verify that the Raspberry Pi is connected to the internet, that the access token is correct, and that the Python script is running without errors.
- Firewall Issues: Ensure that your firewall is not blocking the necessary ports for SSH or your IoT platform's communication.
- Network Address Translation (NAT): If your Raspberry Pi is behind a NAT router, you may need to configure port forwarding to allow external access to the SSH port.
Conclusion:
Remote control and monitoring of a Raspberry Pi using SSH and remote IoT platforms is a powerful technique for a wide range of applications. By following the steps outlined in this article and utilizing the available resources, you can unlock the full potential of your Raspberry Pi and access it from anywhere in the world. Remember to prioritize security and choose the right tools and platforms for your specific needs.
- Aman Jambavat Wyze Bollywood More Profiles News
- Annie Potts Husbands From Ghostbusters To Lasting Love

Mastering SSH Remote IoT Raspberry Pi Example Free For Your Projects

Mastering SSH Remote IoT Raspberry Pi Example Free For Your Projects
RemoteIoT Platform SSH Key Free Access For Raspberry Pi The Ultimate Guide
