Unlock SSH IoT Anywhere: A Complete IP Address Guide
Ever found yourself needing to tweak a setting on your smart thermostat while miles away from home? Gaining secure, remote access to your IoT devices is not just a convenience; it's a necessity in today's hyper-connected world.
The Internet of Things (IoT) has exploded, connecting everything from light bulbs to industrial machinery. But this interconnectedness introduces new challenges, particularly around security and accessibility. Imagine managing a fleet of IoT sensors deployed across a vast agricultural landscape, or remotely troubleshooting a critical device in a manufacturing plant. The ability to securely access and control these devices from anywhere becomes paramount.
| Category | Information |
|---|---|
| Topic | SSH IoT Anywhere |
| Definition | Securely accessing and managing IoT devices remotely using SSH. |
| Key Components | IoT device, SSH server, Client device, Internet connection, Router with port forwarding (optional), Public IP address (or DDNS). |
| Benefits | Remote management, Security, Automation, Cost-effectiveness, Improved troubleshooting. |
| Challenges | Configuration complexity, Security risks (if not properly secured), Network dependencies. |
| Related Information | SSH Protocol Overview |
Secure Shell (SSH) provides that secure pathway. It's a cryptographic network protocol that allows you to securely access and manage devices remotely. Think of it as a digital tunnel that protects your data from prying eyes as it travels across the internet. For IoT devices, SSH offers a robust solution for remote access, configuration, and troubleshooting.
- Aayushi Jaiswal Web Series Your Guide To The Mustsee Shows
- Woojins Stray Kids Exit What Really Happened Solo Career
Using SSH to access IoT devices from anywhere on Windows 10 presents a powerful and secure method for managing your smart devices. This approach allows you to connect to your devices securely over the internet, provided you have the correct IP address and credentials. It's especially useful if you're managing a network of IoT devices scattered across the globe and need a secure way to access them from anywhere.
One of the primary challenges in remotely accessing IoT devices is obtaining the device's IP address. To connect SSH remotely to IoT devices, you need the IP address of your IoT device. There are several ways to find it, but its crucial to ensure the IP address of the remote machine is correct.
First, enable SSH on the IoT device. Most IoT devices have an option to enable SSH in their settings. This usually involves navigating to the device's configuration panel, often accessible through a web browser or a dedicated mobile app, and toggling the SSH service to the "on" position. Consult your device's documentation for specific instructions, as the process can vary significantly between manufacturers.
- Did Kylie Kelce Have An Accident The Truth Revealed
- Nina Simones Granddaughter Estate Battles Kamala Harris Feud
Next, set a static IP address for your IoT device to ensure that it remains consistent. Assigning a static IP address to your IoT device helps to avoid configuration headaches down the line. This can typically be done through your router's configuration settings. Look for a section labeled "DHCP Reservation" or "Static DHCP," where you can associate a specific IP address with the device's MAC address. This ensures that the device always receives the same IP address, even after it's been disconnected and reconnected to the network.
If you're connecting over the internet, you'll need to configure port forwarding on your router. To connect to your IoT device from outside your local network, you'll need to configure port forwarding on your router. This process involves redirecting external traffic to the internal IP address of your IoT device and the desired port (usually 22 for SSH). This is the essence of making your IoT device accessible from the wider internet. Think of this as labeling your virtual door with a specific address.
Create a new rule by specifying the internal IP address of your IoT device and the desired port (usually 22 for SSH). Best practices for port forwarding include using a static IP address to avoid configuration issues in the future.
Before proceeding, verify your public IP address is correct. Obtain your public IP address. This is the address that your internet service provider (ISP) assigns to your router, and it's the address that devices outside your local network will use to connect to your network. You can easily find your public IP address by searching "what is my IP" on Google or using a website like whatismyip.com.
Now you can connect via SSH from anywhere. Launch PuTTY and enter the IP address of your IoT device in the host name field. The IP address allows PuTTY to locate and connect to your IoT device. Ensure the connection type is set to SSH, and the port is set to 22, which is the default port for SSH connections.
To establish a connection, replace `username` with your IoT device's username and `device_ip_address` with the device's IP address. The port the SSH daemon is listening to should not be blocked by a firewall or forwarded incorrectly. Also, ensure the username and password are correct. Inaccurate credentials or firewall rules can prevent a successful connection.
One advanced technique is using SSH keys instead of passwords, which can enhance security and simplify the login process. Here's how to set them up: generate an SSH key pair on your client machine (the computer you're connecting from), copy the public key to the IoT device, and configure the SSH server on the IoT device to accept key-based authentication. This eliminates the need to type in your password every time you connect, and it's far more resistant to brute-force attacks.
When managing IoT devices remotely, security is paramount. In today's interconnected world, SSH IoT anywhere IP address free services have become increasingly important for remote access and secure communication. Secure Shell (SSH) plays a crucial role in enabling users to connect to IoT devices remotely while maintaining data privacy and security.
UFW (Uncomplicated Firewall) is a firewall configuration tool that runs on top of iptables, included by default within Ubuntu distributions. It provides a streamlined interface for configuring common firewall use cases via the command line. Here are some additional configurations for the SSH daemon to extend previous security measures:
Add user filtering with the `AllowUsers` option in the `sshd_config` file. For example:
`AllowUsers [email protected]. [email protected]. otherid1 otherid2`
This allows `johndoe` and `admin2` only from `192.168.1.*` addresses, and `otherid1`, `otherid2` from anywhere. You can also restrict access to specific IP addresses using UFW. The syntax is the same as above, but we are going to restrict the destination IP address too:
`$ sudo ufw allow from {ip_address_here} to any port 22`
To allow incoming SSH connections from a specific IP address named `202.54.1.1`, enter:
`$ sudo ufw allow from 202.54.1.1 to any port 22`
Furthermore, a Dynamic DNS (DDNS) solution can be deployed to keep track of the gateway router's IP address as it's being accessed remotely. DDNS services automatically update your domain name to point to your current IP address, even if it changes. This is especially useful if your ISP assigns you a dynamic IP address, which can change periodically. Without DDNS, you'd have to manually update your DNS records every time your IP address changes, which can be a major headache.
With the right setup, you'll have the tools to leverage IoT capabilities, and adding VPN protection ensures you can confidently manage and monitor your IoT devices from anywhere.
By following the steps outlined, you can gain secure, remote access to your IoT devices, manage your IoT devices from anywhere in the world, provided you have the correct IP address and credentials, and leverage the power of SSH for secure communication and remote management.
Whether you're a hobbyist, developer, or enterprise, understanding SSH and its application to IoT is essential for secure and efficient remote device management. This is the power of SSH IoT anywhere with a free IP address. The ip address allows PuTTY to locate and connect to your IoT device.
To find the remote machine's IP address, use the `ip` command (on the remote computer):
`$ ip addr show | grep inet inet 127.0.0.1\/8 scope host lo inet 10.1.1.5\/27 brd 10.1.1.31 [.]`
If the remote computer doesn't have the `ip` command, try `ifconfig` instead (or even `ipconfig` on Windows).
Users who partake in this method often assume that with SSH protocols, remote access will always be secure and efficient, especially if combined with a VPN for added protection.
- Vikram Height Age More The Untold Story Revealed
- Lionel Richie His Alabama Roots Family History Explored

How To Use SSH IoT From Anywhere Login On Mac For Free The Ultimate Guide

How To Use SSH IoT From Anywhere Login On Mac For Free The Ultimate Guide
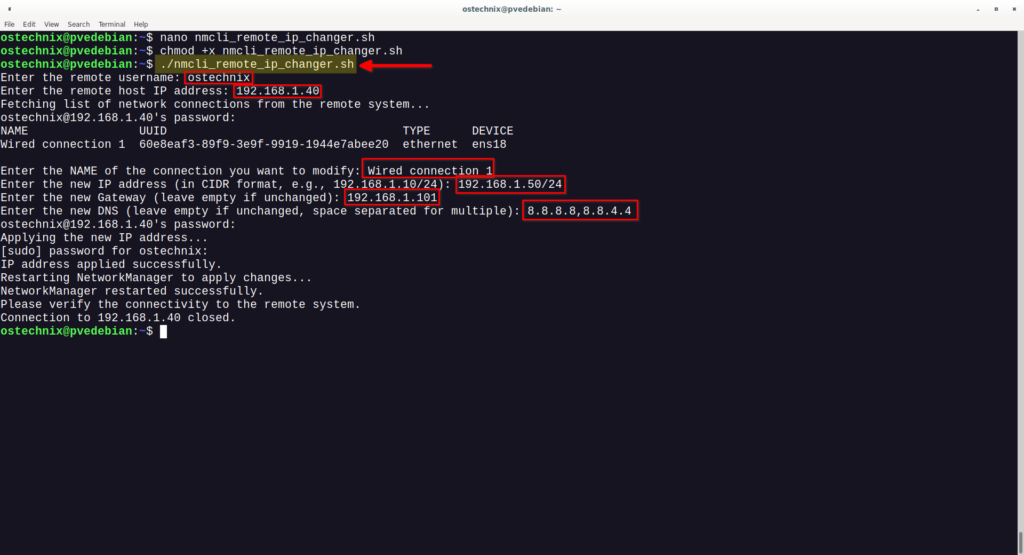
How To Assign IP Address To Remote Linux Systems Via SSH OSTechNix
