Secure IoT Device Management: AWS SSH Setup Explained!
Are you struggling to manage your IoT devices securely from a distance? The ability to remotely access and control your devices is no longer a luxury but a necessity, especially with the increasing reliance on IoT technology across various industries.
The convergence of cloud computing and the Internet of Things (IoT) has created a powerful paradigm shift in how we manage and interact with devices remotely. Setting up a secure and reliable connection to these devices is paramount, and the combination of AWS (Amazon Web Services), SSH (Secure Shell), and tools like Raspberry Pi has become increasingly popular among tech enthusiasts and professionals. This article delves into the intricacies of establishing a robust and secure remote access solution for your IoT devices using AWS, SSH, and other relevant tools.
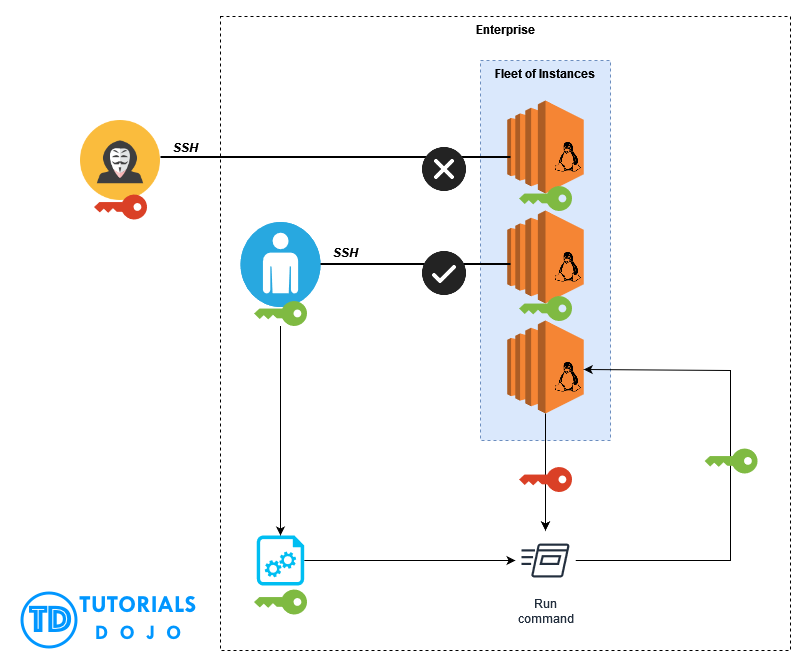
Setting up a remote IoT VPC SSH Raspberry Pi AWS setup is gaining traction among tech enthusiasts and professionals who seek efficient methods to manage and control their IoT devices from anywhere in the world. As cloud computing and IoT technologies advance, having the ability to manage these devices securely through a remote connection has become invaluable. This setup is essential in sectors such as healthcare and finance, where data protection and privacy are of utmost importance. The integration of AWS IoT Remote SSH ensures that all communications are encrypted and routed through AWS's secure channels, providing a reliable way to manage devices remotely.
- Remote Access Raspberry Pi Your Complete Guide Year
- Keeganmichael Keys Adoption Family Parents And Roots Revealed
Whether you are managing a large fleet of IoT devices or troubleshooting a single system, having a solid understanding of setting up IoT device SSH on AWS is crucial. In this guide, we will dissect what you need to know about setting up your Raspberry Pi with AWS and enabling secure SSH access via a virtual private network. Mastering remote access to IoT systems through AWS is becoming more important for both professionals and hobbyists.
One of the primary methods for establishing a secure connection is through the Secure Shell (SSH) protocol. SSH provides an encrypted channel for communication between your local machine and the remote IoT device. This encryption is crucial for protecting sensitive data from being intercepted during transmission. Lets explore the key components and steps involved in setting up a secure remote access solution.
To initiate, you must download the source access token when creating the tunnel to connect to the local proxy. This step is essential for establishing the initial secure link. With this method, you can use other services aside from SSH, like FTP, to connect to the remote device. A foundational step in configuring this remote access involves setting up SSH for IoT devices. This process includes configuring the device, generating SSH keys, and establishing a secure connection. IoT devices with SSH support, such as Raspberry Pi, are essential for this setup.
- Untold Story Luke Bryans Sister Kellys Tragic Passing
- Cryptos Impact Exploring Web3 Society And The Future Of Finance
First and foremost, you must ensure that the remote device has an SSH daemon running. The SSH daemon is a program that listens for incoming SSH connections and handles the authentication and encryption processes. Most Linux-based IoT devices, such as Raspberry Pi, come with an SSH daemon pre-installed. However, you may need to enable it manually. You can check the status of the SSH daemon by running the following command in the terminal:
Once the SSH daemon is running, the next step is to configure the device to accept SSH connections. This typically involves modifying the SSH daemon configuration file, which is usually located at /etc/ssh/sshd_config. You will need root privileges to modify this file. Open the configuration file using a text editor, such as nano or vim:
In the configuration file, look for the following line:
#Port 22
Remove the # symbol to uncomment the line and ensure that the port number is set to 22, which is the default SSH port. If you want to use a different port, you can change the number accordingly. However, it is generally recommended to stick with the default port unless you have a specific reason to change it. Next, look for the following line:
#PermitRootLogin prohibit-password
This line controls whether or not root login is allowed via SSH. By default, it is set to prohibit-password, which means that root login is allowed only if you use SSH keys. It is generally recommended to disable root login altogether for security reasons. To do so, change the line to:
PermitRootLogin no
After making these changes, save the configuration file and restart the SSH daemon to apply the changes. You can restart the SSH daemon by running the following command:
Once the SSH daemon is configured, the next step is to generate SSH keys. SSH keys are a more secure alternative to passwords for authenticating SSH connections. They consist of a private key, which is stored on your local machine, and a public key, which is stored on the remote device. When you connect to the remote device via SSH, the SSH client on your local machine uses the private key to prove your identity to the remote device. If the remote device has the corresponding public key, it will allow you to log in without requiring a password.
To generate SSH keys, open a terminal on your local machine and run the following command:
This command will generate a new SSH key pair using the RSA algorithm. You will be prompted to enter a file in which to save the key. The default location is /home/your_username/.ssh/id_rsa. You can accept the default location by pressing Enter. You will also be prompted to enter a passphrase for the key. A passphrase is like a password for your SSH key. It is used to encrypt the private key so that it cannot be used by anyone who does not know the passphrase. It is highly recommended to enter a passphrase for your SSH key. However, if you do not want to use a passphrase, you can leave it blank by pressing Enter twice.
After the SSH keys have been generated, you need to copy the public key to the remote device. There are several ways to do this. One way is to use the ssh-copy-id command. This command automatically copies the public key to the ~/.ssh/authorized_keys file on the remote device. To use the ssh-copy-id command, run the following command:
You will be prompted to enter the password for the remote device. After you enter the password, the public key will be copied to the remote device. Another way to copy the public key to the remote device is to manually copy the contents of the ~/.ssh/id_rsa.pub file on your local machine to the ~/.ssh/authorized_keys file on the remote device. To do this, you can use a text editor to open the ~/.ssh/id_rsa.pub file and copy the contents to the clipboard. Then, connect to the remote device via SSH and use a text editor to open the ~/.ssh/authorized_keys file. If the ~/.ssh/authorized_keys file does not exist, you can create it. Finally, paste the contents of the clipboard into the ~/.ssh/authorized_keys file.
Once the public key has been copied to the remote device, you should be able to connect to the remote device via SSH without being prompted for a password. To connect to the remote device, run the following command:
If you are prompted for a password, it means that the public key was not copied correctly. In that case, you will need to repeat the steps above to copy the public key to the remote device.
You can also create a tunnel from the AWS IoT console, either from the tunnels hub or the details page of an IoT thing that you created. When creating a tunnel from the tunnels hub, you can select either the quick setup or the manual setup. The AWS IoT Remote SSH download functionality is built on top of AWS IoT Core, which provides the backbone for device connectivity, data ingestion, and secure communication. This integration ensures that all remote access activities are logged, monitored, and compliant with industry standards.
For those who are new to this, heres a breakdown of setting up Ubuntu on AWS for IoT device SSH access. This involves creating an AWS account, launching an Ubuntu instance, generating SSH keys, and connecting to the instance. Once connected, you can optimize the system for your specific needs. The process is critical for ensuring the safety and efficiency of your IoT infrastructure. With the increasing adoption of Internet of Things (IoT) devices, managing them through secure protocols like SSH (Secure Shell) has become essential.
Furthermore, to configure the local proxy, you can use the AWS IoT Device Client or download the local proxy reference implementation from GitHub. The tunnel creation methods in the AWS IoT console include tutorials that show you how to create a tunnel using the AWS Management Console and the OpenTunnel API. For example, to open a tunnel using the manual setup method, see the example of running the remote device that connects to the AWS IoT Device Gateway and is configured with an MQTT topic subscription. For another example tutorial, see how to open a tunnel and start an SSH session to a remote device.
To ensure the source is connected to the tunneling service, install the Node.js library ws using the command: C) install the node.js library ws, with the following command:. After this, you should see that the source is connected to the tunneling service in your terminal. To confirm, in the AWS IoT console, select your tunnel and check that the source is connected (E) in the aws iot console, select your tunnel and check that the source is connected.. To connect the destination to the tunneling service, repeat this step (F) to connect the destination to the tunneling service, repeat this step..
Iot device ssh download aws ubuntu:. By now, you should have a clear understanding of how to download and set up ubuntu on aws for iot device ssh access. This process involves creating an aws account, launching an ubuntu instance, generating ssh keys, and connecting to the instance. Once connected, you can optimize the system. Iot device ssh download aws is a process that combines these technologies to ensure seamless and secure operations. This guide will walk you through the essentials of setting up, managing, and optimizing this integration for maximum efficiency and security. Are you looking to securely download and manage iot devices via ssh on aws? This process is critical for ensuring the safety and efficiency of your iot infrastructure. With the growing adoption of internet of things (iot) devices, managing them through secure protocols like ssh (secure shell) has become essential.
This comprehensive approach ensures not only a secure connection but also an efficient management system for your IoT devices within the AWS ecosystem. Whether for personal projects or enterprise-level deployments, understanding these processes is key to leveraging the full potential of IoT technology. Instead, aws iot remote ssh ensures that all communications are encrypted and routed through aws's secure channels, providing a reliable way to manage your devices remotely. Whether you're managing a fleet of iot devices or troubleshooting individual systems, aws iot remote ssh download provides the tools you need to stay productive and secure.
Managing and optimizing the setup of IoT devices via SSH on AWS necessitates a holistic understanding of various interconnected components. From securely downloading necessary software to establishing encrypted communication channels, each step plays a vital role in ensuring the integrity and functionality of the system. This guide elucidates the essential practices for setting up, managing, and optimizing an IoT device infrastructure on AWS. Furthermore, this integration ensures that all remote access activities are logged, monitored, and compliant with industry standards.
For more information, see connect a device to the aws iot device gateway. \u3053\u306e\u8a18\u4e8b\u3067\u306f\u3001aws iot core \u3067\u7ba1\u7406\u3055\u308c\u3066\u3044\u308b\u30c7\u30d0\u30a4\u30b9\u306b\u5bfe\u3057\u3066\u3001aws iot device management \u306e\u30bb\u30ad\u30e5\u30a2\u30c8\u30f3\u30cd\u30ea\u30f3\u30b0\u3092\u5229\u7528\u3057\u3066\u9060\u9694\u304b\u3089\u30c8\u30e9\u30d6\u30eb\u30b7\u30e5\u30fc\u30c6\u30a3\u30f3\u30b0\u3092\u884c\u3046\u65b9\u6cd5\u3092\u7d39\u4ecb\u3057\u307e\u3059\u3002
- Remembering Preethi Karnam Vanderbilt Alumnas Legacy Impact
- Discovering Henry De Niro Early Life Family Legacy

How To Master IoT Device SSH Download AWS A Complete Guide
IoT SSH Download AWS The Ultimate Guide To Securely Accessing Your
Mastering IoT SSH Download AWS A Comprehensive Guide To Secure And
