Remote Raspberry Pi IoT: SSH Access From Anywhere [Guide]
Ever wished you could command your Raspberry Pi IoT device from a beach in Bali? Achieving seamless, secure remote access via SSH to your Raspberry Pi IoT device from any corner of the globe isn't just a possibility; it's an absolute necessity for unlocking the true potential of your projects.
By carefully following the methodologies detailed in this guide, you'll be empowered to construct a robust, easily accessible, and remarkably powerful platform tailored to all your IoT requirements. The ability to connect to your Raspberry Pi IoT remotely via SSH from anywhere using an Android device has rapidly transformed from a luxury to a fundamental requirement for tech enthusiasts and seasoned professionals alike. Whether you're tasked with managing intricate remote server networks or automating the various facets of your home devices, this comprehensive guide is meticulously crafted to walk you through each essential step of the process.
| Topic | Details |
|---|---|
| Device | Raspberry Pi |
| Connectivity | SSH (Secure Shell) |
| Remote Access | Anywhere with internet |
| Operating System | Raspberry Pi OS (formerly Raspbian) |
| Typical Uses | Home automation, remote monitoring, server management |
| Security Considerations | Key-based authentication, firewall configuration |
| Mobile Access | Android SSH Clients |
| Download Resources | Raspberry Pi Official Downloads |
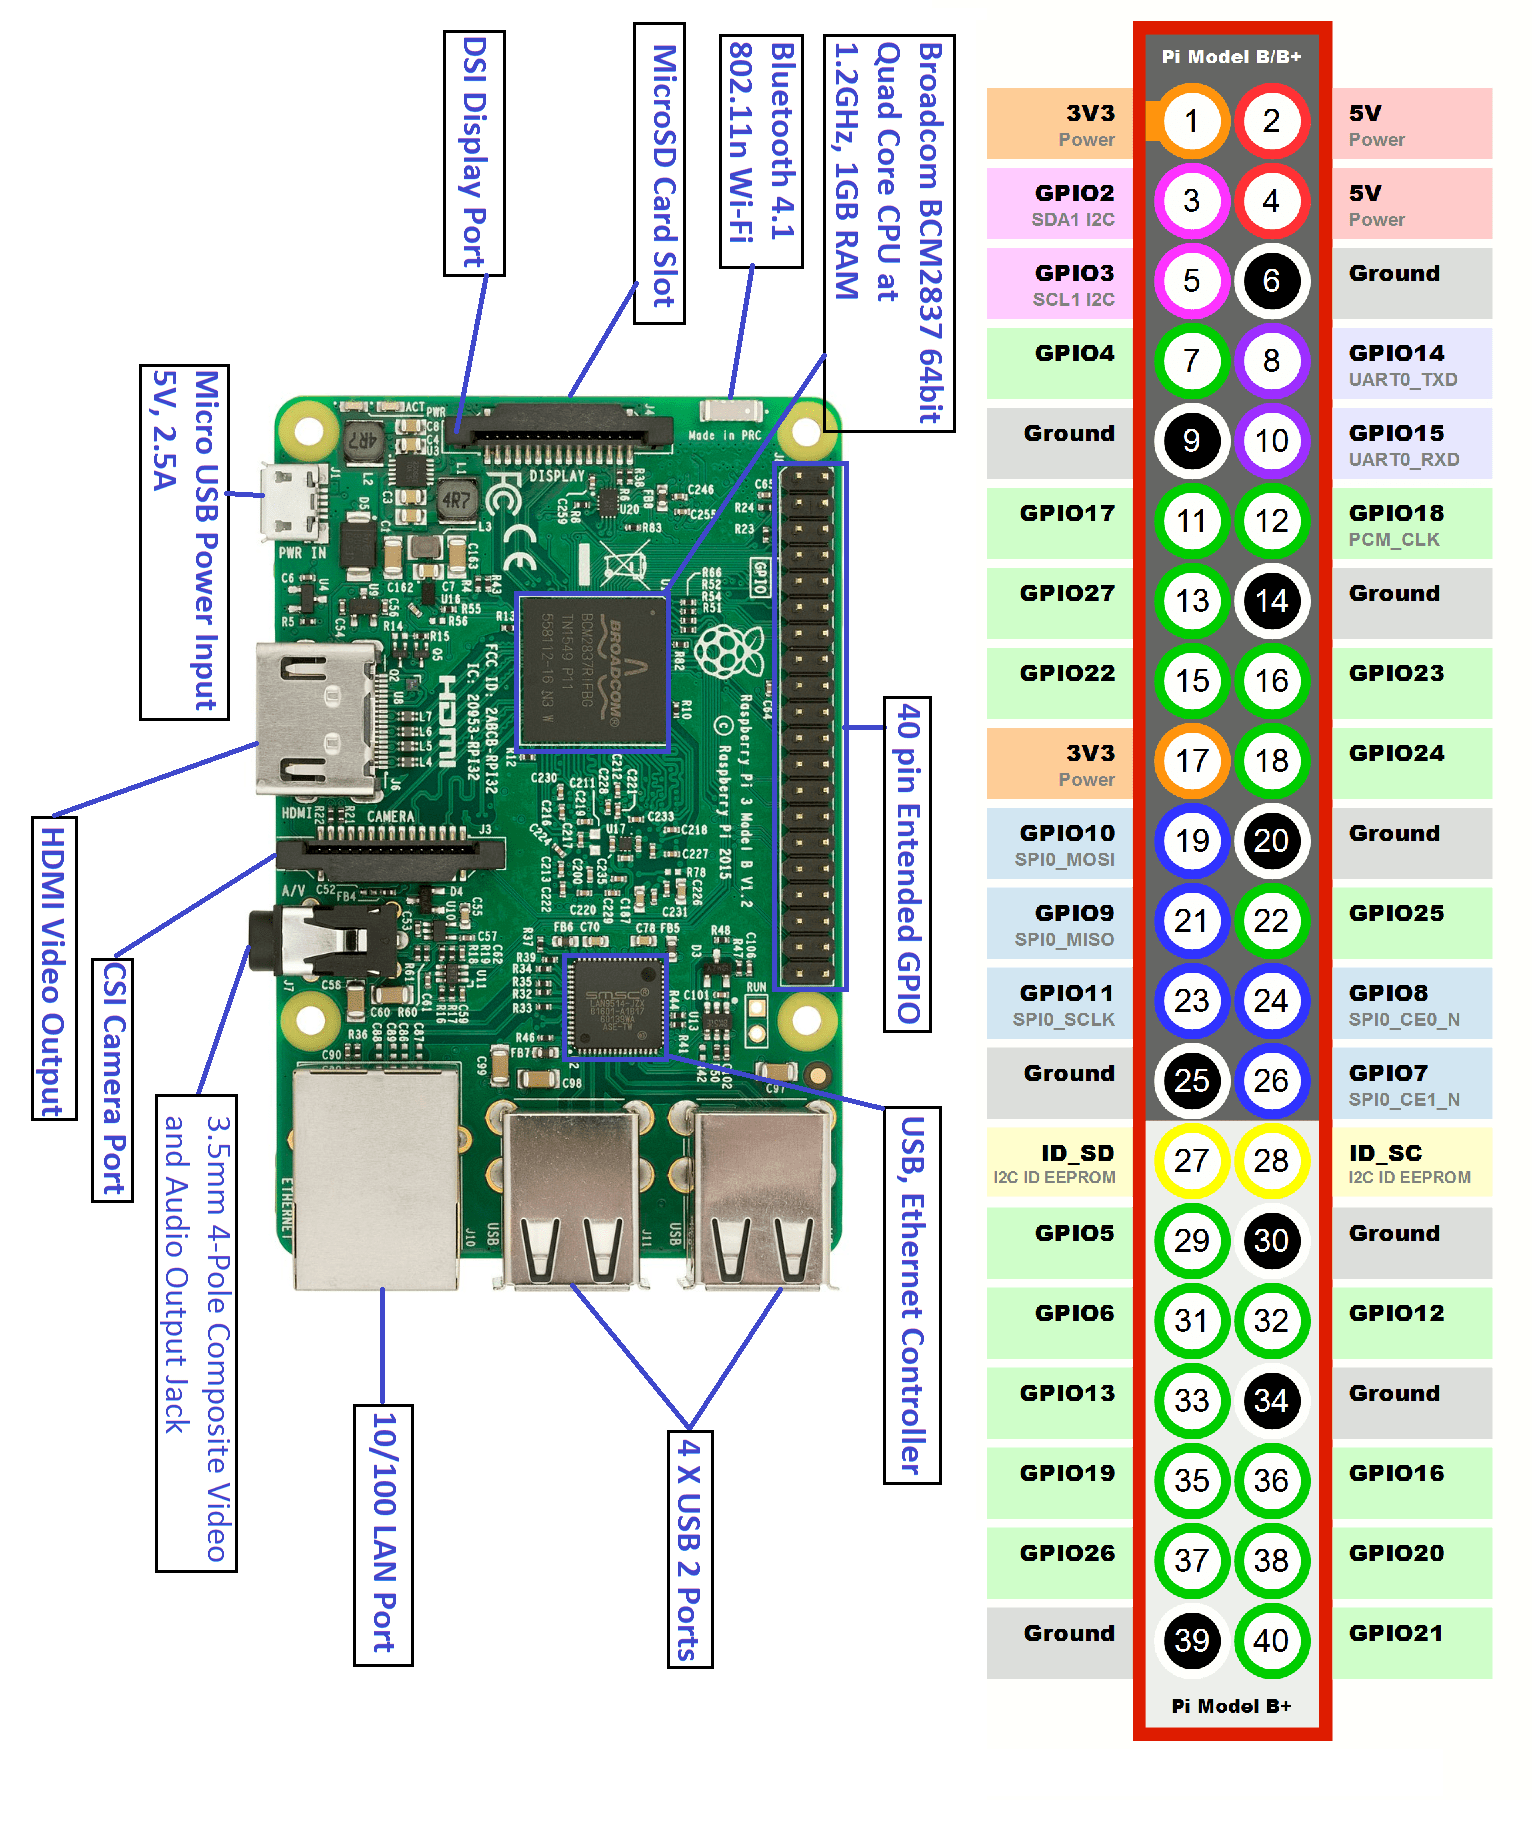
The very first step in unlocking the ability to access your Raspberry Pi's terminal from your phone hinges on enabling the SSH protocol. This protocol, for security reasons, is intentionally disabled by default. But fear not, there exist several straightforward ways to activate it, each catering to different scenarios and levels of user comfort. If you have the option to connect a monitor for the initial setup phase, then the most direct method involves utilizing the Raspberry Pi configuration tool. You can typically find this utility nestled within the main menu, usually categorized under "Preferences" or "System Tools," depending on your specific operating system version.
- Rob Squad Divorce Drama What Really Happened 2024 Update
- Did Kylie Kelce Have An Accident The Truth Revealed
Remote access to your Raspberry Pi IoT device has undergone a significant transformation; it has genuinely never been more streamlined or accessible. Whether your passion lies in the realm of hobbyist projects or you're a seasoned professional developer pushing the boundaries of IoT capabilities, the ability to exert control over and meticulously manage your devices from any geographical location around the globe represents an immensely powerful capability. This carefully crafted guide is designed to methodically walk you through the entire process of setting up secure SSH access to your Raspberry Pi, leveraging the widespread accessibility and versatility of an Android device.
Consider the possibility of accessing your IoT devices with free web SSH directly from your Android device, enabling remote control of your Raspberry Pi from anywhere with an internet connection. This guide is your comprehensive resource for achieving precisely that. Imagine directly connecting to your Raspberry Pi even when it resides behind a firewall, effectively making it appear as if it were seamlessly integrated within your local network. This level of accessibility is increasingly crucial in today's deeply interconnected world, where IoT devices are rapidly permeating every facet of our lives.
The availability of SSH remote IoT device Raspberry Pi free download options is extensive, offering a diverse range of tools and applications to suit various needs and preferences. To truly maximize the benefits of remote access, consider utilizing the hostname to connect to your Raspberry Pi from any location, simplifying the connection process and enhancing overall usability. The Google Play Store is teeming with top-tier Android apps specifically designed for SSH access to Raspberry Pi devices. Managing your Raspberry Pi directly from an Android device has never been more intuitive, thanks to the proliferation of these feature-rich applications. Here are just a few of the best options available, each offering a unique blend of functionality and user-friendliness.
- Cat Keenan Onlyfans Leaks What You Need To Know Hot Content
- Somali Telegram Channels Wasmo Raaxo More Join Now
By strategically leveraging the power of SSH and readily available Android apps, you can ensure that your IoT setup transcends mere functionality, becoming dynamically accessible from anywhere in the world. Setting up SSH on your Raspberry Pi and subsequently enabling remote access via an Android device might initially appear to be a daunting task, but with the assistance of the right guidance, it quickly transforms into a remarkably straightforward process. In this article, we will delve into a comprehensive exploration of accessing SSH on your Raspberry Pi IoT from any location, with a focus on utilizing Android devices. This detailed guide, penned by Connorcalderwood on April 25, 2025, serves as your comprehensive roadmap to seamless remote access.
Within this guide, you'll acquire all the essential knowledge pertaining to accessing SSH on your Raspberry Pi IoT from any location, directly from your Android device. We will methodically cover the fundamental principles, identify the indispensable tools you'll require, and unveil a collection of professional tips and tricks designed to make your life significantly easier. Furthermore, I'll include a selection of invaluable resources to further enhance your understanding and proficiency.
Remote SSH IoT behind a router using Raspberry Pi and Android represents an increasingly prevalent solution for managing IoT devices both securely and with exceptional efficiency. With the relentless rise of smart homes, the expansion of industrial automation, and the increasing sophistication of remote monitoring systems, the inherent ability to access and exert control over IoT devices from any point on the globe has evolved from a mere convenience to an absolute essential. Before you can effectively harness the capabilities of SSH Raspberry Pi IoT from any location, including downloading content to your Android device, you must first enable SSH on your Raspberry Pi itself. This foundational step paves the way for secure and reliable remote access.
This comprehensive guide will meticulously walk you through the step-by-step process of setting up remote SSH access on your Raspberry Pi, leveraging the power and flexibility of free Android apps to ensure that you remain consistently connected and in control. We will also explore setting up SSH on your Raspberry Pi. To enable SSH on your Raspberry Pi, you need to follow a few simple steps. This section will guide you through the process, ensuring your Raspberry Pi is ready for remote access. By default, SSH is disabled on Raspberry Pi for security reasons.
To enable it, follow these steps: The ability to SSH Raspberry Pi IoT from anywhere for free is a powerful feature. This guide will walk you through the process of setting up remote SSH access on your Raspberry Pi using free Android apps, ensuring you stay. To establish an SSH connection between your Raspberry Pi and mobile phone, you'll first need to enable SSH on your Raspberry Pi. As we explore the world of SSH Raspberry Pi IoT from anywhere download Android, you'll discover how to configure your Raspberry Pi, set up SSH access, and use Android apps to manage your IoT projects. We'll also cover troubleshooting tips, security measures, and advanced configurations to help you maximize your experience.
Imagine controlling your IoT devices, managing your Raspberry Pi, and downloading Android apps from anywhere in the world. Sounds like a dream, doesn't it? With SSH IoT anywhere Android, you can manage your IoT devices from virtually anywhere in the world. Mastering remote access SSH Raspberry Pi IoT from anywhere download opens up a world of possibilities.
Whether you're a developer, network administrator, or simply a tech enthusiast, understanding how to use SSH IoT can significantly enhance your capabilities. Mastering remote access SSH Raspberry Pi IoT from anywhere download is a valuable skill. SSH key management platforms offer a centralized, automated, and secure way to manage keys, ensuring secure remote access, improving operational efficiency.
To truly unlock the potential of your Raspberry Pi in the realm of IoT, understanding and implementing secure remote access is paramount. The Secure Shell (SSH) protocol provides a secure and encrypted channel for managing your device from afar. This means that regardless of your physical location, you can interact with your Raspberry Pi as if you were directly connected to it. This is especially beneficial for headless setups, where there is no monitor, keyboard, or mouse directly attached to the Raspberry Pi.
The first step to taking control of your Raspberry Pi remotely involves enabling the SSH service. By default, this service is disabled for security reasons. However, enabling it is a straightforward process. One of the easiest methods is to use the Raspberry Pi Configuration tool. If you have a monitor connected, simply navigate to the main menu, find the "Preferences" section, and select "Raspberry Pi Configuration." Within this tool, go to the "Interfaces" tab and enable SSH. If you don't have access to a monitor, you can enable SSH by placing an empty file named "ssh" (without any extension) in the root directory of the boot partition on the SD card. When the Raspberry Pi boots, it will detect this file and automatically enable the SSH service.
Once SSH is enabled, you'll need to know the IP address of your Raspberry Pi. If you're on the same local network, you can use tools like `nmap` or a network scanner app on your smartphone to discover the IP address. Alternatively, you can log in to your router's administration panel, where you'll typically find a list of connected devices and their corresponding IP addresses. Once you have the IP address, you can use an SSH client on your computer or smartphone to connect to your Raspberry Pi. The default username is "pi" and the default password is "raspberry." However, it is highly recommended to change this password immediately for security reasons.
Connecting to your Raspberry Pi from outside your local network requires a bit more configuration. Since most home networks use Network Address Translation (NAT), your Raspberry Pi is likely behind a router that hides its internal IP address from the outside world. To access it remotely, you'll need to set up port forwarding on your router. This involves configuring your router to forward incoming traffic on a specific port (usually port 22, the default SSH port) to the internal IP address of your Raspberry Pi. You'll also need to know your public IP address, which you can easily find by searching "what is my IP" on Google.
However, relying on your public IP address can be problematic because it can change periodically, especially if you have a dynamic IP address assigned by your internet service provider. To overcome this, you can use a Dynamic DNS (DDNS) service. DDNS services provide you with a fixed hostname that automatically updates to reflect your current public IP address. Several DDNS providers offer free or paid services, such as No-IP, DuckDNS, and DynDNS. Once you've set up a DDNS hostname, you can use that hostname instead of your IP address to connect to your Raspberry Pi remotely.
Security is paramount when it comes to remote access. Using the default username and password is a major security risk, as it makes your Raspberry Pi vulnerable to brute-force attacks. Always change the default password to a strong and unique password. Another important security measure is to disable password-based authentication and use SSH keys instead. SSH keys provide a more secure way to authenticate to your Raspberry Pi, as they rely on cryptographic key pairs rather than passwords. To set up SSH keys, you'll need to generate a key pair on your client machine (e.g., your computer or smartphone) and then copy the public key to the `.ssh/authorized_keys` file on your Raspberry Pi.
Firewalls are another essential security component. A firewall acts as a barrier between your Raspberry Pi and the outside world, blocking unauthorized access. The Raspberry Pi comes with the `iptables` firewall, which you can configure to allow only SSH traffic on port 22 (or any other port you've configured for SSH). You can also use more user-friendly firewall management tools like `ufw` (Uncomplicated Firewall), which provides a simpler interface for configuring firewall rules.
For even greater security, consider using a VPN (Virtual Private Network). A VPN creates an encrypted tunnel between your client machine and your Raspberry Pi, protecting your data from eavesdropping and tampering. There are several VPN server software packages available for the Raspberry Pi, such as OpenVPN and WireGuard. Setting up a VPN can be more complex than setting up SSH keys or firewalls, but it provides an extra layer of security and privacy.
Once you've configured your Raspberry Pi for remote access, you can use a variety of SSH clients to connect to it. On Linux and macOS, the `ssh` command is built-in. On Windows, you can use PuTTY, a popular free SSH client. On Android, several SSH client apps are available, such as Termius, JuiceSSH, and ConnectBot. These apps provide a convenient way to manage your Raspberry Pi from your smartphone or tablet.
With SSH access to your Raspberry Pi, you can perform a wide range of tasks remotely. You can manage files, install software, configure services, and monitor system performance. You can also use SSH tunneling to forward ports and access services running on your Raspberry Pi from your local machine. For example, you can forward port 80 (the default HTTP port) to access a web server running on your Raspberry Pi from your browser.
Here's a practical example: Suppose you have a Raspberry Pi connected to a camera, and you want to monitor your home remotely. You can install a motion detection software on your Raspberry Pi and configure it to send you email alerts when motion is detected. You can then use SSH to check the camera feed, view recorded videos, and adjust the motion detection settings, all from your smartphone, no matter where you are in the world.
Another example: Imagine you have a Raspberry Pi controlling your home automation system. You can use SSH to remotely adjust the thermostat, turn on or off lights, and monitor the status of your security system. You can even set up automated scripts that run on your Raspberry Pi based on specific events or schedules. The possibilities are endless.
Troubleshooting SSH connections can be challenging, but there are a few common issues to look out for. First, make sure that the SSH service is running on your Raspberry Pi. You can check the status of the SSH service using the command `sudo systemctl status ssh`. If the service is not running, you can start it using the command `sudo systemctl start ssh`. If you're having trouble connecting, check your firewall settings to ensure that SSH traffic is allowed. Also, double-check your port forwarding configuration on your router.
If you're using SSH keys, make sure that the public key is correctly copied to the `.ssh/authorized_keys` file on your Raspberry Pi. The permissions on the `.ssh` directory and the `authorized_keys` file must be correct (700 for the directory and 600 for the file). If you're still having trouble, try enabling verbose logging in your SSH client. This will provide more detailed information about the connection process, which can help you identify the problem.
Mastering remote access SSH to your Raspberry Pi IoT device is an essential skill for anyone working with IoT devices. It allows you to manage your devices from anywhere in the world, securely and efficiently. By following the steps outlined in this guide, you can set up a secure and reliable remote access solution for your Raspberry Pi and unlock its full potential in the world of IoT.
Remember to prioritize security by changing the default password, using SSH keys, configuring firewalls, and considering a VPN. With these precautions in place, you can confidently manage your Raspberry Pi remotely and enjoy the flexibility and convenience it provides. So, go ahead and unleash the power of remote access and take your IoT projects to the next level. The possibilities are limitless.
Let's consider some advanced configurations. One such configuration involves setting up SSH multiplexing. SSH multiplexing allows you to reuse an existing SSH connection for multiple sessions. This can be useful if you frequently open multiple SSH connections to your Raspberry Pi, as it can reduce the overhead of establishing a new connection each time. To enable SSH multiplexing, you need to add the following lines to your SSH client configuration file (usually located at `~/.ssh/config`):
Host * ControlMaster auto ControlPath ~/.ssh/sockets/%r@%h-%p ControlPersist 600
The `ControlMaster auto` option tells SSH to automatically create a master connection if one doesn't already exist. The `ControlPath` option specifies the path to the control socket that will be used for multiplexing. The `ControlPersist` option tells SSH to keep the master connection alive for 600 seconds (10 minutes) after the last session is closed. With SSH multiplexing enabled, you can open multiple SSH sessions to your Raspberry Pi without having to re-authenticate each time.
Another useful configuration is port forwarding. Port forwarding allows you to forward traffic from your local machine to a specific port on your Raspberry Pi, or vice versa. This can be useful for accessing services running on your Raspberry Pi from your local machine, or for exposing services running on your local machine to the outside world. To set up port forwarding, you can use the `-L` or `-R` options with the `ssh` command.
For example, to forward port 8080 on your local machine to port 80 on your Raspberry Pi, you can use the following command:
ssh -L 8080:localhost:80 pi@your_raspberry_pi_ip_address
This will create a tunnel between port 8080 on your local machine and port 80 on your Raspberry Pi. You can then access the web server running on your Raspberry Pi by browsing to `http://localhost:8080` in your web browser.
To forward port 22 on your Raspberry Pi to port 2222 on your local machine, you can use the following command:
ssh -R 2222:localhost:22 pi@your_raspberry_pi_ip_address
This will create a tunnel between port 22 on your Raspberry Pi and port 2222 on your local machine. You can then connect to your Raspberry Pi using SSH by connecting to `localhost` on port 2222.
In addition to SSH multiplexing and port forwarding, you can also use SSH to create a SOCKS proxy. A SOCKS proxy allows you to route all of your internet traffic through your Raspberry Pi, which can be useful for bypassing firewalls or accessing geo-restricted content. To create a SOCKS proxy, you can use the `-D` option with the `ssh` command.
ssh -D 1080 pi@your_raspberry_pi_ip_address
This will create a SOCKS proxy on port 1080 on your local machine. You can then configure your web browser or other applications to use this proxy to route your internet traffic through your Raspberry Pi.
By mastering these advanced SSH configurations, you can unlock even more possibilities for remote access to your Raspberry Pi and take your IoT projects to the next level. Experiment with different configurations and find what works best for your needs. The power is in your hands.
Furthermore, consider implementing intrusion detection systems (IDS) to monitor your Raspberry Pi for suspicious activity. Tools like Fail2ban can automatically block IP addresses that exhibit malicious behavior, such as repeated failed login attempts. Integrating an IDS adds an additional layer of security to your remote access setup, protecting your Raspberry Pi from potential threats.
Regularly update your Raspberry Pi's operating system and software packages to patch security vulnerabilities. Keeping your system up-to-date is crucial for maintaining a secure environment and preventing attackers from exploiting known weaknesses. Use the `sudo apt update` and `sudo apt upgrade` commands to update your system.
Also, consider using a hardware security module (HSM) to store your SSH keys. An HSM is a dedicated hardware device that provides a secure environment for storing cryptographic keys. Using an HSM can protect your SSH keys from theft or compromise, even if your Raspberry Pi is physically accessed by an attacker.
Finally, always be mindful of the information you transmit over SSH. While SSH provides encryption, it's still possible for attackers to intercept your traffic if they have access to your network. Avoid transmitting sensitive information, such as passwords or financial data, over SSH unless you're absolutely sure that your connection is secure. By following these advanced security measures, you can significantly enhance the security of your remote access setup and protect your Raspberry Pi from potential threats. Remember, security is an ongoing process, and it's important to stay vigilant and adapt your security measures as new threats emerge.
One often overlooked aspect of remote Raspberry Pi management is the effective monitoring of system resources. SSH provides a gateway, but tools like `top`, `htop` (a more visually appealing version of `top`), and `vmstat` offer real-time insights into CPU usage, memory consumption, and disk I/O. Regularly checking these metrics can help you identify performance bottlenecks and optimize your applications for efficiency.
For a more comprehensive monitoring solution, consider installing tools like Grafana and Prometheus. These tools allow you to collect and visualize system metrics over time, providing valuable insights into the long-term performance of your Raspberry Pi. You can set up dashboards to monitor key metrics and receive alerts when thresholds are exceeded.
Another important aspect of remote management is the ability to manage system logs. The Raspberry Pi's system logs contain valuable information about system events, errors, and warnings. Analyzing these logs can help you troubleshoot problems and identify security threats. You can use tools like `grep`, `awk`, and `sed` to search and filter the logs, or you can use a log management tool like `logrotate` to automatically rotate and archive the logs.
For more advanced log analysis, consider using a centralized logging solution like ELK (Elasticsearch, Logstash, Kibana). ELK allows you to collect logs from multiple sources, index them in Elasticsearch, and visualize them in Kibana. This can be invaluable for troubleshooting complex problems and identifying patterns across multiple Raspberry Pi devices.
Remote software updates are another critical aspect of Raspberry Pi management. Keeping your software up-to-date is essential for security and stability. You can use the `apt` package manager to update your software remotely. The `sudo apt update` command updates the package lists, and the `sudo apt upgrade` command upgrades the installed packages.
For unattended updates, you can use the `unattended-upgrades` package. This package automatically installs security updates and other important updates without requiring user intervention. To install and configure `unattended-upgrades`, use the following commands:
sudo apt install unattended-upgrades sudo dpkg-reconfigure unattended-upgrades
Follow the prompts to configure `unattended-upgrades` to automatically install security updates. This will ensure that your Raspberry Pi is always up-to-date with the latest security patches.
Remote backups are another essential aspect of Raspberry Pi management. Regularly backing up your data is crucial for protecting against data loss due to hardware failure, software corruption, or security breaches. You can use tools like `rsync` or `tar` to create backups of your Raspberry Pi's file system. You can then store these backups on a remote server or cloud storage service.
For a more automated backup solution, consider using a backup tool like `BorgBackup`. `BorgBackup` is a deduplicating backup program that efficiently stores backups and minimizes storage space. It also supports encryption and compression, making it a secure and efficient backup solution.
To further streamline remote access, consider setting up custom aliases and functions in your SSH configuration. Aliases allow you to create short, memorable commands that execute longer, more complex commands. Functions allow you to define custom functions that can be called from the command line.
To create an alias, add the following line to your `~/.bash_aliases` file:
alias update='sudo apt update && sudo apt upgrade'
This will create an alias called `update` that executes the `sudo apt update` and `sudo apt upgrade` commands. To create a function, add the following lines to your `~/.bashrc` file:
function check_disk_space() { df -h }
This will create a function called `check_disk_space` that executes the `df -h` command. You can then call this function from the command line by typing `check_disk_space`.
By setting up custom aliases and functions, you can significantly streamline your remote Raspberry Pi management tasks and make your workflow more efficient. Experiment with different aliases and functions and find what works best for your needs.
Remember that mastering remote access to your Raspberry Pi is a journey, not a destination. Continue to explore new tools and techniques and adapt your workflow as your needs evolve. With dedication and persistence, you can become a master of remote Raspberry Pi management and unlock its full potential in the world of IoT.
- Untold Story Luke Bryans Sister Kellys Tragic Passing
- Jimmy Swaggarts Net Worth Scandals Ministry Millions

How To SSH Into Raspberry Pi For IoT From Anywhere A Complete Guide
How To Access Your Raspberry Pi Iot Projects From Anywhere Using Ssh On

How To Access SSH Raspberry Pi IoT From Anywhere A Comprehensive Guide
